In the Event setting panel choose filter by upcoming or past events. All other fields are optionals: http://d.pr/i/1hhp8
Create a page to show all your events:
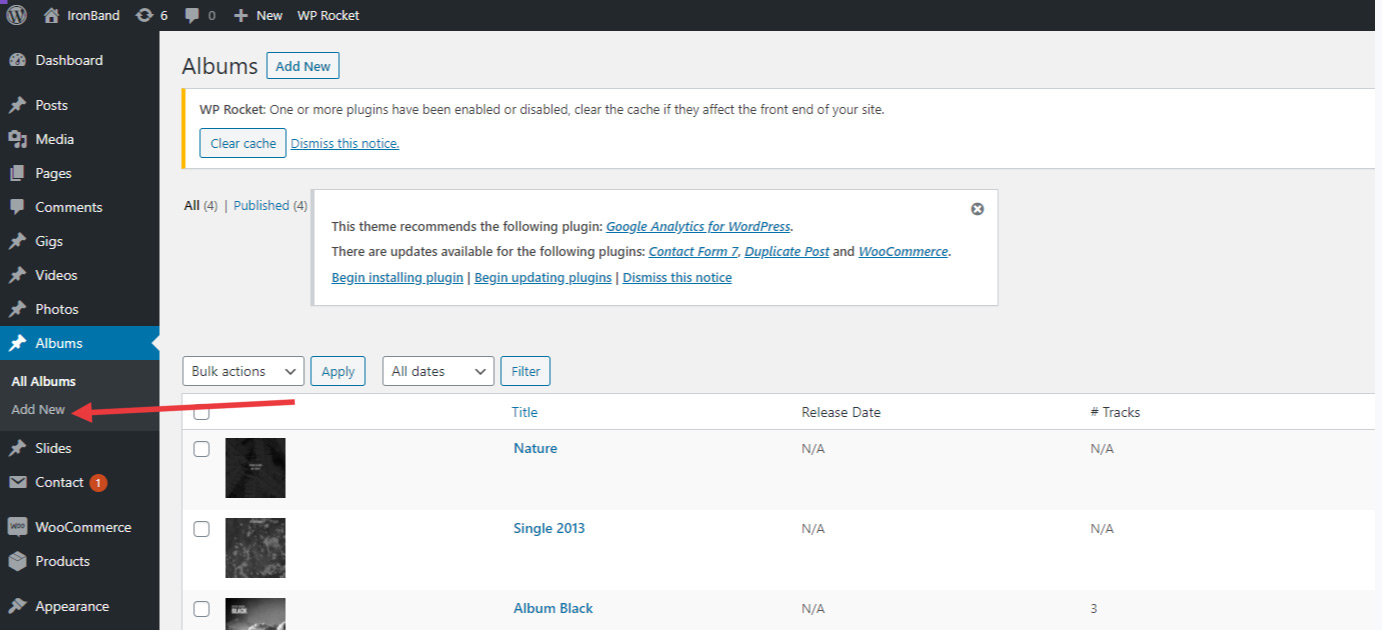
Go to WP-Admin > Pages > Add New
Enter the title of your page.
Select the template "Event Posts" in the "Page Attributes" section: http://d.pr/i/bi9a
In the "Events Query" section choose filter by upcoming or past events: http://d.pr/i/19UW2
Save it.
2. How I change hard-coded texts?
Some texts in our theme are hard-coded, like back and next buttons or labels days, hours, minutes from the countdown. You can't find an option to edit them on the wp-admin dashboard.
So how we can customize them without modifying our theme? The solution is simple. We need to translate string from our theme.
Example. you want to translate "No upcoming events scheduled yet. Stay tuned!" to "We are on vacation for two years", we need to make an English translation. How to do it?
*** In this tutorial, I use often "[your theme name]". Its intended to be replaced by your own theme name eg(fwrd, lush, croma, soundrise, etc..)
2. Open Poedit and open file /wp-content/themes/[your theme name]/languages/[your theme name].pot.
3. Click on edit and find, and search for the string you want to modify.
4. If you don't find the string, please open a /wp-content/plugins/[your theme name]-music/languages/[your theme-name]-music.pot and repeat step 3.
5. When you have found in which file is located the string please click on create a new translation.
6. Select the same language selected in your WordPress.
If you are not sure which language is set to your wordpress, please go to wp-admin>setting>general.
7. Find your string again and fill the translation field with your new string.
8. Click on save and save your files in /wp-content/languages/themes.
* If the modification is from our plugin, you need to save file in /wp-content/languages/plugins and the file name should start with "[your theme name]-music-en_US". Exemple: "croma-music-en_US.po".
When we save the po file, a .mo file will be automatically generate. The mo file is the file read by wordpress.
3. How to get my Twitter API Keys ?
In order to use a Twitter feed on your website, you need to tell Twitter that you are the owner of account used. To do this, you need to create a Twitter Application.
Here's the steps
Creating a Twitter Application
The Twitter Widget will never ask for your password, as it gets all your required data from the Open Authentication keys and secrets you will get by creating your application at Twitter. It also means that if you change your twitter password, you won’t need to update any of the details of your Widget.
Enter a unique Name (anything you want), a Description (again this is just for you), and your site's URL. You can leave the Callback URL empty as it is not used for this implementation. Yay, success - OK!
Click the "Keys and Access Tokens" tab.
Click the button "Create my access tokens". See screenshot: http://d.pr/i/17Uhs
Now you should see all the keys that are required. See screenshot: http://d.pr/i/1go15
Good. Now go to your WordPress Dashboard and go to the theme options. Click the Social Media tab.
You can just copy the required information into the exact corresponding inputs fields of the theme options. See screenshot: http://d.pr/i/1fH4x
4. I can't see the Slider Revolution when I move from one page to another.
Make sure that Nice scroll is turned off by going to the Theme Options Dashboard > General Settings
Nice scroll is a deprecated features and we don't use it anymore.
5. How to change the Slug or page URL of my page?
You have created a page and the slug name doesn't match the page name. It has an undesirable "-2" which is added. You are trying to remove it but you can't.
Most often, the reason is that your permalink is already in use.
Check the permalinks of your pages and beware that the permalink might be already used by a page in the trash. Make sure to check in your trash section of your pages/posts.
Another case that it won't work is because you are trying to use a slug name that is dedicated as a parent of a post type. Permalinks: "/discography", "/event", "/videos" are dedicated. You cannot use them.
So if you have created a page called "videos", the default permalink will be "/videos-2". You can't use "videos". You can use another slug name as "video" or "-videos-" Or you can also make your page a child page, so the permalink will change. (ex: "/medias/videos")
6. How to activate the child theme ?
The child theme comes with the full package that you can download from ThemeForest.
Make sure that you previously uploaded the main theme before installing the child theme.
3. Go to the /Theme/ folder and you will see the child theme zip file (eg: lush-child.zip) which is the child theme that you will upload to your Wordpress
4. Go to WP-Admin > Appearance > Themes and click on 'add new'.
5. Select the child theme's zip file and upload it.
6. Activate it.
7. How to add a link in the menu that scrolls to a page section (Anchor)
First you need to create an anchor that will be the "target".
With Visual Composer, it's very easy to create an anchor.
1. Click the "pen" icon of the row element you want the anchor:
2. Fill the 'ID Name for Navigation' field with the name of the anchor you want. (Eg: about, music or contact). Do not use space or special characters.
3. Add a new menu item in your menu: Go to WP-Admin > Appearance > Menus.
4. Create a new 'Custom Links'. In the 'url' field, add "/#" and your Anchor ID you previously set. So if your anchor is about, the url will be /#about
* If you need to point to an anchor which is on another page than your homepage, then you need to add the slug name in the url. Eg: /bio/#about
8. Recommended image size (resolution)
Here our image recommendation for a best result with our theme.
For general backgrounds
1920px wide.
Use the height of your choice
For the Blog "Featured images":
1144 px wide.
Use the height of your choice, but for best results, use the same ratio for all images.
For the Event "Featured images":
532 px wide.
Use the height of your choice, but for best results, use the same ratio for all images.
For the Album "Featured images":
500 px wide.
500 px high.
For best results, use the same ratio for all images.
YOU CANNOT INSTALL WORDPRESS THEMES ON A WORDPRESS.COM BLOGGING ACCOUNT It’s important to understand that an account on WordPress.com is not the same as a website running a self hosted copy of WordPress. If you have purchased a theme with this intention you should contact envato support.
2. Download Theme
A. If you’ve downloaded whole theme package (see image below), unzip it.
There you will find 3-4 folders such as:
Documentation
PSD
Theme
Open the theme folder and you will find 2 zip files:
ironband.zip (this is the theme you need to upload)
ironband-child.zip (see child section for more info about child theme)
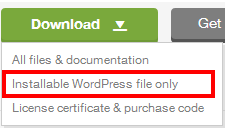
B. Alternatively you can simply download the installable WordPress file (see image below) You should have the themeforest-5398241-ironband-music-band-dj-wordpress-theme-wordpress_theme.zip archive by itself, which is the file to upload directly via the dashboard.
3. Install Theme
To install the theme, in your WordPress Admin Panel (wp-admin) go to “Appearance > Themes > Add New > Upload > browse to your .zip file. (see image below).
Please note that some hostings have a restriction on a size of a file that you are uploading. If any warnings appear, most probably, your hosting has file size limit. And the theme .zip file is too large to be uploaded via WordPress Panel. You can try contacting your hosting provider and ask to ease this restrictions.
Otherwise you can install theme via FTP. Simply unzip the installable file and upload the theme folder via FTP into “your_site/wp-content/themes/”.
For more info and help on installing the theme via FTP, follow this link.
Attention! Theme will work fine on the vast majority of correctly installed and configured WordPress sites without any additional settings. However on some (very rear) hosting configurations you can notice that images on your site are not displaying. If you are experiencing this issue, please follow these steps to fix it:
1. Make sure that theme installed strictly to “your_site/wp-content/themes/” folder.
2. The folder “your_site/wp-content/uploads” must be created. On some hostings you’ll need to set its CHMOD to 755, on others – to 777.
If above steps did not yield any results, please don’t hesitate to address this issue directly to yourhosting company. Since this is most likely a server-related problem, we will not be able to help you!
4. Activate Theme
In “Appearance > Themes > activate the theme by hitting the correspondent “Activate” link.
Attention! To assure your permalinks are being rendered correctly (the web-site does not return “404 Not Found” error) after switching the theme, follow “Dashboard > Settings > Permalinks” and click “Save Changes”.
5. Install Plugins
After theme activation you will see a “recommended plugins” notice. Click the “Begin installing plugins” link in order to proceed to installation. Make sure you activate them after installation.
Import our live demo !
Import our live demo is the best way to start with the theme.
This allow you to see how we built layouts and use elements through the theme. Then you can delete the content you don’t want, or replace our content with your.
We’ve built an tool to automatically import all the content and setting that you have seen on our demo.
Attention: This will option will FLUSH all your current content, data and images. It will completely replace your actual website by our demo’s content!
To import our demo, go to Ironband > Import Default Data > In the drop-down, select the “demo” you want then click Import default data.
* Depending your server speed, this can take up to 3 minutes. If it has spins for over 15 minutes, you might have server issues.
When import has finish, you are all set !
If you have issue and you can’t import our default data using this tool, here’s an alternative. Our theme option’s Import Default Data button might not work on some server. It sometimes happen with some server and error is actually unknown. Usually, it’s a security permission.
Use the default wordpress importer (tools > import > wordpress). You might have to install the plugin if you are using it for the first time. Then, you will be able to import the XML file (which is located in ironband/import/)
General Guidelines
Make a Page your Homepage
Navigate to the “WP-admin > Settings > Reading” interface (see image below).
In the “Front page displays” section choose “static page” radio-button.
In the “Front page:” selector choose the page that you have created to be the Homepage.
Optional. Also you can choose which page will display your blog posts in the “Posts page:” selector.
Import Dummy Content
We have set a tool to allow you to automatically import all the content, settings and images that you have seen on our demos.
If this option do not work or you prefer import dummy content manually here’s how:
Use the default wordpress importer (tools > import > wordpress). You might have to install the plugin if you are using it for the first time. Then, you will be able to import the XML file (which is located in ironband/import/)
Assign posts to an existing user. Then check “Download and import file attachments”. Then click submit.
Disable Comments
To hide comments on specific pages or post, go to “WP-admin > Pages > Edit your page”.
Simply check the “Discussion” checkbox in Screen Option – corresponding “Discussion” box will appear. Then uncheck “ALLOW COMMENTS”.
Copy the code and paste it to corresponding field in menu. E.g.<i class="fa fa-smile-o"></i>
Theme Options
Pagination Settings
This theme option page allow you yo set how many items you want to see in the page template before showing a paging.
Please note that this doesnt apply to widgets. This only apply to:
Event Template
Video Template (List and Grid)
Photo Albums Template (List and Grid)
* For posts (or news), see below…
To set how many items you want to display in the blog template, go to Settings > Reading.
You have 4 different options for the pagination of your page templates.
Displays links for next and previous pages (e.g. : « Previous Page — Next Page »)
Displays a row of paginated links (e.g. : « Prev 1 … 3 4 5 6 7 … 9 Next »)
Displays a single link to dynamically load more items (e.g. : « More Posts ») (AJAX)
Dynamically load more items as you scroll down (infinite scrolling) (AJAX)
How can i change the number of posts per page ?
Go to Settings > Reading. You will see the setting beside: “Blog pages show at most” (http://d.pr/i/gj2i)
Widgets Areas
Manage your WordPress Widget Areas and additional settings related to page templates and widgets.
This allow you to create widget “zone” or “group” to use later on in different section of your site (Appearance > Widgets)
The drop downs such as Single Post Default Sidebar, Single Video Default Sidebar, Single Event Default Sidebar, etc, apply ONLY to NEW post. When you create a new post (or event or video or photo album, etc..) this will set a default sidebar automatically instead of selecting which sidebar you want for your different post templates.
Header and Logos
it’s in the header section that you have to set your logos.
In Ironband, we use 2 different logos.
The header logo (and its retina logo) is used in the header of the website.
The menu logo (and it’s retina logo) is used in the menu when you open it.
If you want to have transparency in your logo, you must upload a PNG logo with transparency.
Look on YouTube for tutorials: “How to make a transparent logo PNG”
Quick tips about Retina logos:
When people visit your website using a retina screen (such as iPhone 5, iPads, or new Apple’s products) they will see the retina logos. The retina logo is as simple as a TWICE bigger logo than your regular logo. So if your regular logo is 200X100 your retina logo should be 400X200 then we take care to display it 200X100 on the website so it will looks very sharp on retina displays.
Post Settings
These options apply for all the single post.
You have the option to have the featured image shows in every post by choosing 3 options:
FullWidth will stretch your featured image to appear fullwidth in your template
Original will not stretch your featured image. It will use your original uploaded image.
None will hide the featued image on every post.
The rest of the options are pretty straight forward.
Social Media
To add social media icons
Go to Irondband > Social Media > Add Social Media
We use Font-Awesome for the preloaded icons. If you Font-Awesome do not provide the icon you want, you will have to upload it manually (see step 6)
Sharing Option (Add This)
To use ADD THIS for your content sharing, please refer to the addthis.com website on how to use this feature.
To embed your Add This (or Share This) buttons, just paste the code they have provided you into the Custom Social Buttons field.
Footer Newsletter
To enabled/disabled the newsletter horizontal bar in the footer , go to Ironband > Footer Newsletter.
To know more about the newsletter widget, please refer to the NEWSLETTER section in this user guide.
Content Manager
Events
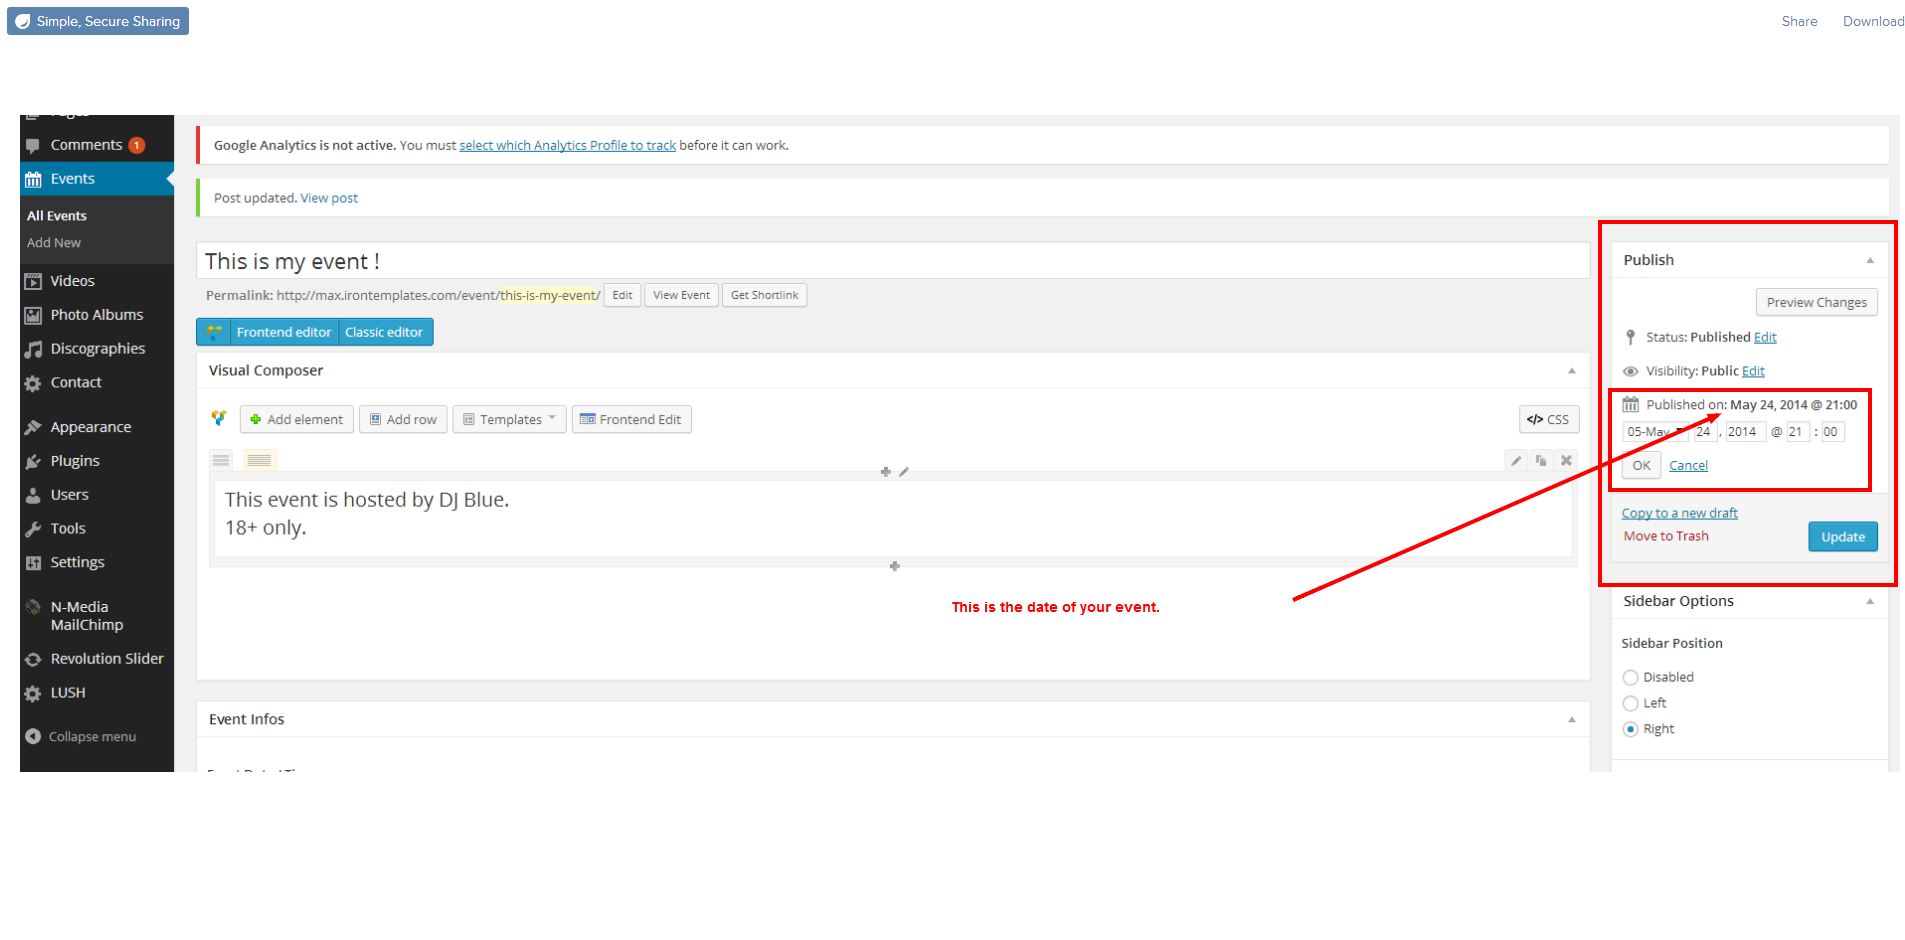
Set the Date
To set the date of your event, edit the publish date of the post.
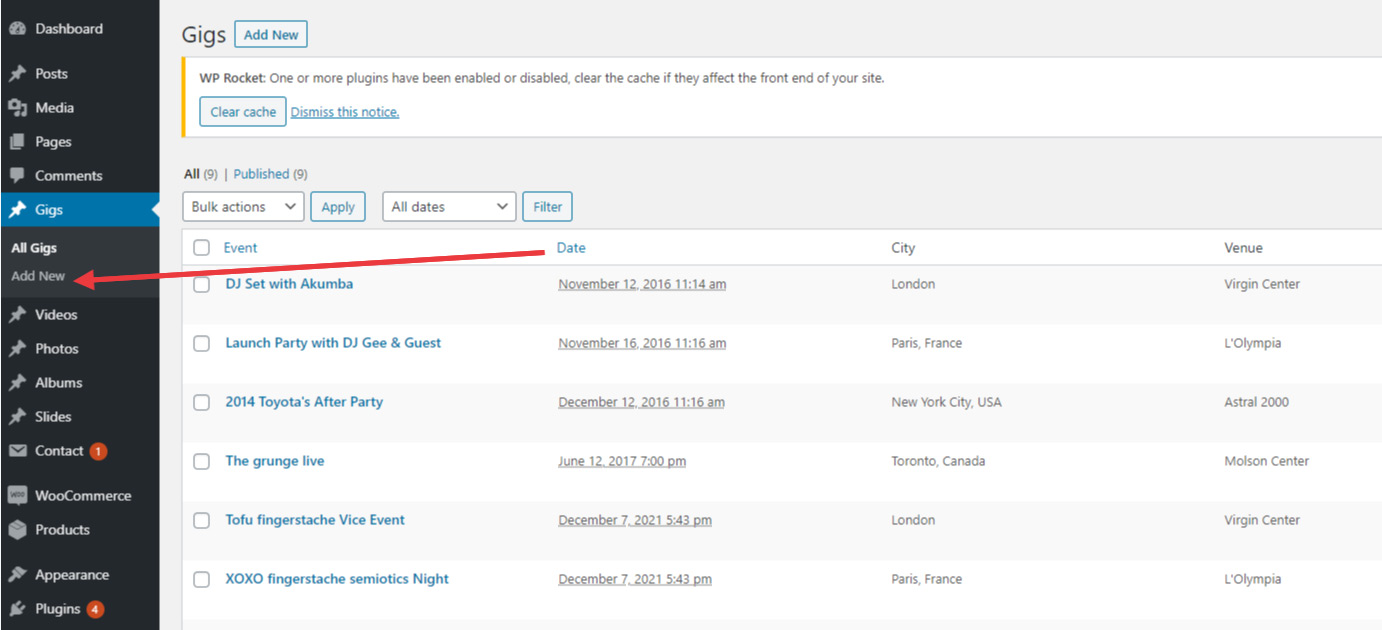
Adding a new event
See screencast below:
Managing Past events from Upcoming Event
Ironband will automatically set your event as a PAST event when its date is older than today. If you set your gig’s date as a date that will take place, it will be considered as an upcoming event. If the date is older than “today”, it will be recognized as a Past Event.
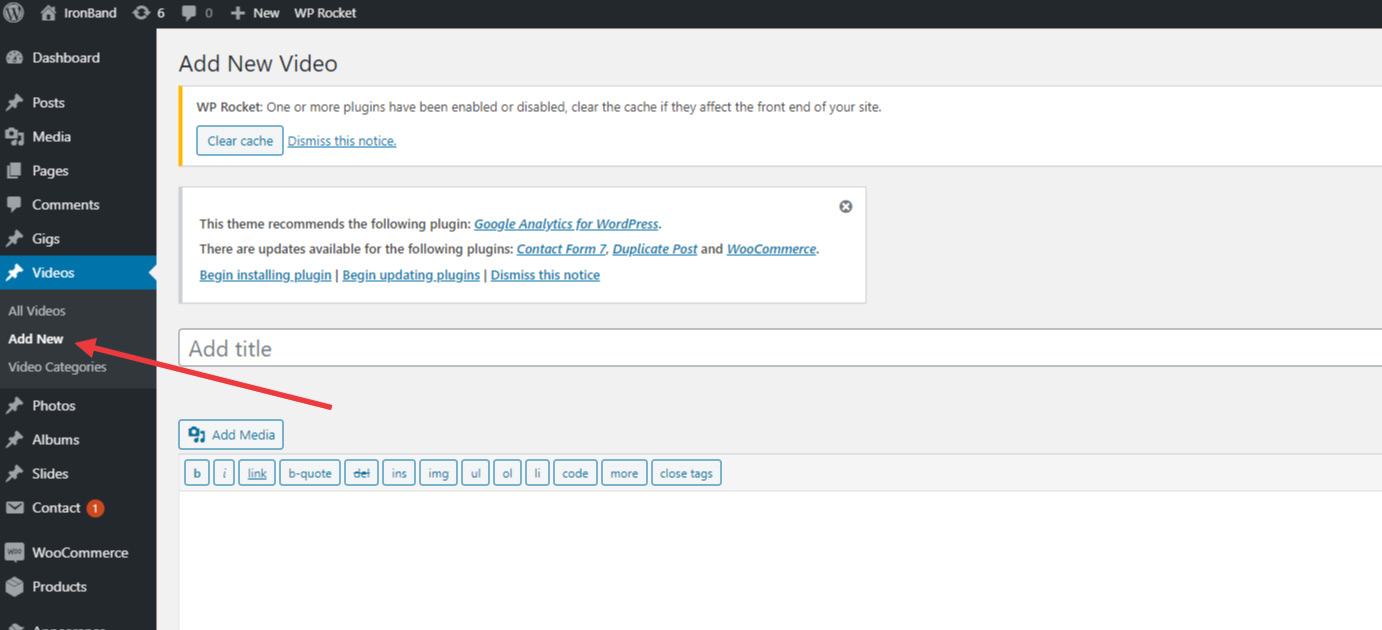
Videos
To add a video, see screencast below:
Discography
See Screenshot below about adding a new album to your discography:
10. How to change the background color or background image
Our theme has many ways to change background images or colours.
Changing the overall background:
To change the overall background image or colour go to the Theme options dashboard > Look and Feel. You can set the overall background by either uploading a background image or only change the background colour.
Changing a background on a specific page:
We can also select an individual background on a specific page. When we edit a page, we can select a background in the 'page setting' panel.
Upload your image in the "Background Image" or change the main background color.
If you want to use a background image, make sure to set a main background color as well. It's very important. Also make sure that the 'Main Background Transparency' has the value to 0.
Changing a background on a specific row in a page:
So you want to change a background image to put your own image. Let say you want to change this image which is part of the homepage only:
Edit your page. then seek for the row where your background image should be contained. Click the little pen in the top right corner of the row, then click design tab. See screencast:
If you want to edit the height of the image, basically you will have to edit the height of the row's space. So click the little pen of the row to edit it. go to the design tab, and adjust the top and bottom padding according to your needs.
11. I can't activate a plugin. Where is the license key ? Is it included with your theme ?
Sometimes, plugins will ask you to enter a Licence Key or API Key. Well, you don't need a licence key or API key to activate it. The plugin will still work even if you don't have that licence key.
The licence key or API key is only used for automatic updates offered by the plugin authors and is available if you purchase the plugin for yourself at codecanyon.net
Since we include the plugin directly (for free) into our theme, we made sure the plugin is 100% compatible with the theme. If you decide to purchase the plugin license for yourself and update the plugin, the theme might break.
We (IronTemplates) are responsible to update the pre-packaged plugins that come with our theme. We release plugin updates on a regular basis after testing them and make sure they are 100% compatible with our theme. It's the way it works for every theme that offers third-party plugins packaged into the theme.
12. Where can I change my logo ?
To change the logo, go to the Theme options dashboard > Logos.
It is important to upload a standard logo and a retina logo for retina device. The retina logo should be 2x larger than the standard logo and it's only used on devices that support retina displays.
Our theme has the option to select a different logo on a specific page. That's useful when we wish to have a dark background and our logo by default is dark. To select a logo for a specific page, please edit a page and look in the page settings.
Logo when you scroll down a page:
(If you use the classic-menu only)
For the "Mini" logo that shows up when you scroll down the page, go to the Theme options dashboard > Menu Option.
Select "Mini" or "Mini + Full Width"
And upload a logo in the "Header Logo On Mini" option.
Logo inside the push menu:
If you use the push menu, there is a logo inside it. Go to the Theme options dashboard > Menu Options.
13. How to Change the URL of a Post Type
All post types have a default slug name. If we want to replace "domainName.com/event/fun-night" by "domainName.com/tour/fun-night" we have to:
*We have to replace "event" in the script by the slug we want to customize, and "tour" by its new slug name.
-Finally we have to go to wp-admin>settings>permalinks to re-generate permalinks.
14. How to disable all request to the Google Fonts library
Step 1 : Disable all Google Fonts from theme settings
– Go to wp-admin>Croma>typography: And select a system font (eq: Arial) or click on reset (https://d.pr/i/3ZHbXB) for each element.
- Go to wp-admin>croma>menu: And do the same for the classic menuAND the push menu. You have to change the menu type to reset the typography. (https://d.pr/i/TiY3RM)
- Go to wp-admin>croma-music>Music Player: Select "Inherit" for each typography options.
- Go to wp-admin>croma-music>Event: Select "Inherit" for each typography options.
Step 2 : Disable theme default Google Fonts.
- Ativate the child-theme.
- Edit the function.php file from the child theme.
- Add this code:
function iron_dequeue_googlefonts() { wp_dequeue_style( 'croma-google-font' ); }
Step 3 : Disable all Google Fonts from other plugins
Be sure no elements from plugins as wpbakery and essential grid load some google fonts.
15. How to duplicate Events, Playlists, Artists, Posts and Custom-Posts
First, you need to install a plugin called "Duplicate Post". - Go to WP-Admin > Appearance > Install Plugins > Add New - Search for "Duplicate Post", install and activate it.
Select Custom Posts you need to duplicate. - Go to WP-Admin > Setting > Duplicate Post - Select the "Permissions" tab - Check all custom posts wanted
A "clone" option is now available below each of your posts.
16. How to setup playlist/discography section or add MP3 and audio files
Display sticky player on page loads
Go to wp-admin > pages and edit your homepage.
Edit the audio player element. (Add a new one if you'd like), select the album and click auto-play. http://d.pr/i/V5VloS
You can hide the player to avoid it to shows up in your page by disabling its parent's column: http://d.pr/i/Zx2kEt
Starting the player from Slider Revolution.
We sometimes use a "Play" button in the big banner on the homepage. The play button needs to be linked to an audio player on your homepage.
Edit your homepage and edit the audio player you will see there.
Choose the album you want to use when the Play button is clicked from Slider Revolution.
To tell Slider Revolution which player you want to fire when you click on the play button, go to wp-admin > Slider Revolution and edit the slide.
Notice the "0" in this code? This means that the first player that shows on your homepage will be fired so make sure that your homepage player is above all the other player on your homepage.
Add an audio player to a page:
Go to WP-Admin > Pages and edit the page of your choice (ex: Homepage)
17. How can I align background image on a specific side. (Especially on mobile device)
WPBakery doesnt have the option to align background as we want but we can add one of those extra class in the "extra class name" field to customize the background position.
bg-left-top
bg-left-center
bg-left-bottom
bg-right-top
bg-right-center
bg-right-bottom
bg-center-top
bg-center-center
bg-center-bottom
18. How to increase the size of my logo ?
Increasing the size of the logo can be done by simple custom CSS. Although providing any assistance for customized/extensive design or script coding is outside our item support, we can help you out with the CSS code because this is just a simple tweak. Kindly copy the CSS code below to your Custom CSS section in your theme options).
/*Increase the size of the logo*/
/*classic menu*/
.classic-menu > ul > li.logo {
overflow: initial;
max-width: calc(100% - 100px);
width: 200px;
}
.classic-menu > ul > li.logo img{
overflow: initial;
width: 100%;
}
/*push menu*/
.logo-desktop{
max-width: calc(100% - 100px);
max-height: 500px;
}
YOU CANNOT INSTALL WORDPRESS THEMES ON A WORDPRESS.COM BLOGGING ACCOUNT It’s important to understand that an account on WordPress.com is not the same as a website running a self hosted copy of WordPress. If you have purchased a theme with this intention you should contact envato support.
2. Download Theme
A. If you’ve downloaded whole theme package (see image below), unzip it.
There you will find 3-4 folders such as:
Documentation
PSD
Theme
B. Alternatively you can simply download the installable WordPress file (see image below) You should have the lush.zip archive by itself, which is the file to upload via the dashboard.
3. Install Theme
To install the theme, in your WordPress Admin Panel (wp-admin) go to “Appearance > Themes > Add New > Upload > browse to your .zip file. (see image below).
Please note that some hostings have a restriction on a size of a file that you are uploading. If any warnings appear, most probably, your hosting has file size limit. And the theme .zip file is too large to be uploaded via WordPress Panel. You can try contacting your hosting provider and ask to ease this restrictions.
Otherwise you can install theme via FTP. Simply unzip the installable file and upload the theme folder via FTP into “your_site/wp-content/themes/”.
For more info and help on installing the theme via FTP, follow this link.
Attention! Theme will work fine on the vast majority of correctly installed and configured WordPress sites without any additional settings. However on some (very rear) hosting configurations you can notice that images on your site are not displaying. If you are experiencing this issue, please follow these steps to fix it:
1. Make sure that theme installed strictly to “your_site/wp-content/themes/” folder.
2. The folder “your_site/wp-content/uploads” must be created. On some hostings you’ll need to set its CHMOD to 755, on others – to 777.
If above steps did not yield any results, please don’t hesitate to address this issue directly to yourhosting company. Since this is most likely a server-related problem, we will not be able to help you!
4. Activate Theme
In “Appearance > Themes > activate the theme by hitting the correspondent “Activate” link.
Attention! To assure your permalinks are being rendered correctly (the web-site does not return “404 Not Found” error) after switching the theme, follow “Dashboard > Settings > Permalinks” and click “Save Changes”.
5. Install Plugins
After theme activation you will see a “recommended plugins” notice. Click the “Begin installing plugins” link in order to proceed to installation. Make sure you activate them after installation.
Import our live demo !
Import our live demo is the best way to start with the theme.
This allow you to see how we built layouts and use elements through the theme. Then you can delete the content you don’t want, or replace our content with your.
We’ve built an tool to automatically import all the content and setting that you have seen on our demo.
Attention: This will option will FLUSH all your current content, data and images. It will completely replace your actual website by our demo’s content!
As you know, Lush is very flexible and you have already seen a couple of demo before buying it. The 3 main demos are:
Lush Hipster
Lush Awake
Lush Spintable
Lush Outlaws
Lush Solo
Lush Classic
Lush Rock
Lush Grenade
To import our demo, go to Lush > Import Default Data > In the drop-down, select the “demo” you want then click Import default data.
* Depending your server speed, this can take up to 3 minutes. If it has spins for over 15 minutes, you might have server issues.
When import has finish, you are all set !
Take note that in our demo, we use a plugin called N-Media MailChimp and it’s linked to our own Mailchimp account. You will have to setup your own mailchimp account to use it. Read more about “MailChimp” in our documentation.
If you have issue and you can’t import our default data using this tool, here’s an alternative. Our theme option’s Import Default Data button might not work on some server. It sometimes happen with some server and error is actually unknown. Usually, it’s a security permission.
Use the default wordpress importer (tools > import > wordpress). You might have to install the plugin if you are using it for the first time. Then, you will be able to import the XML file (which is located in ironband/import/)
General Guidelines
Make a Page your Homepage
Navigate to the “WP-admin > Settings > Reading” interface (see image below).
In the “Front page displays” section choose “static page” radio-button.
In the “Front page:” selector choose the page that you have created to be the Homepage.
Optional. Also you can choose which page will display your blog posts in the “Posts page:” selector.
Import Dummy Content
We have set a tool to allow you to automatically import all the content, settings and images that you have seen on our demos.
If this option do not work or you prefer import dummy content manually here’s how:
Use the default wordpress importer (tools > import > wordpress). You might have to install the plugin if you are using it for the first time. Then, you will be able to import the XML file (which is located in lush/import/)
Assign posts to an existing user. Then check “Download and import file attachments”. Then click submit.
Disable Comments
To hide comments on specific pages or post, go to “WP-admin > Pages > Edit your page”.
Simply check the “Discussion” checkbox in Screen Option – corresponding “Discussion” box will appear. Then uncheck “ALLOW COMMENTS”.
Copy the code and paste it to corresponding field in menu. E.g.<i class="fa fa-smile-o"></i>
Theme Options
General Settings
Head menu position
This option allow you to show the menu on the left or on the right.
Header menu transition
You have 3 options on how the menu will show up. (transitions)
Push: a simple left/right or right/left transition
Rotate Pusher: menu will do a push, then rotate a little bit.
Scale & Rotate Pusher: menu will do a push, then rotate, then scale down. This is our favorite.
There is not other options. We don’t offer support on adding other transitions. It’s at your own risk.
Enable NiceScroll
This will style the default scrollbar and will add a nice scrolling effect.
Enable Fixed Header
This will make the header fixed on page scroll
Show the time on new events
This apply to NEW event that you will create later on. When this option is ON, when you create a new event, the “show time option” is not checked by default. This save time when creating a new event.
Show countdown on rollover
This apply to NEW event that you will create later on. When this option is ON, when you create a new event, the countdown rollover wil not show up.
Hide admin bar on the frontend.
Sometimes it’s annoying to have the WordPress admin bar showing in your site when editing it. This make the bar hide (see image below).
Pagination Settings
This theme option page allow you yo set how many items you want to see in the page template before showing a paging.
Please note that this doesnt apply to widgets. This only apply to:
Event Template
Video Template (List and Grid)
Photo Albums Template (List and Grid)
To set how many items you want to display in the blog template, go to Settings > Reading.
You have 4 different options for the pagination of your page templates.
Displays links for next and previous pages (e.g. : « Previous Page — Next Page »)
Displays a row of paginated links (e.g. : « Prev 1 … 3 4 5 6 7 … 9 Next »)
Displays a single link to dynamically load more items (e.g. : « More Posts ») (AJAX)
Dynamically load more items as you scroll down (infinite scrolling) (AJAX)
Widgets Areas
Manage your WordPress Widget Areas and additional settings related to page templates and widgets.
This allow you to create widget “zone” or “group” to use later on in different section of your site (Appearance > Widgets)
The drop downs such as Single Post Default Sidebar, Single Video Default Sidebar, Single Event Default Sidebar, etc, apply ONLY to NEW post. When you create a new post (or event or video or photo album, etc..) this will set a default sidebar automatically instead of selecting which sidebar you want for your different post templates.
Look and Feel
Color
Here you can change the colors of your website. We have arranged the color options into a way that your theme will remains beautiful. We don’t want that your site looks like a pizza so we made sure that the color palette you choose will be universal through your website.
The featured Color should be your “accent” color. It’s the color that will make a difference.
Here’s a quick draft to learn more about where the colors goes.
If you set a color and want to rollback, click the X icon when picking your color.
Playing with Opacity
You can also play with opacity for each of your color. This is usefull if you set a fullscreen background image and you want opacity through your boxes such as Primary Color 2.
Backgrounds and Full Screen Image Backgrounds
First of all, there is a difference between Body background and Content background.
Body background is used behind your content background, You will see it when you click on the menu.
Take not that you can also set custom color background and image background individually on all your pages and post.
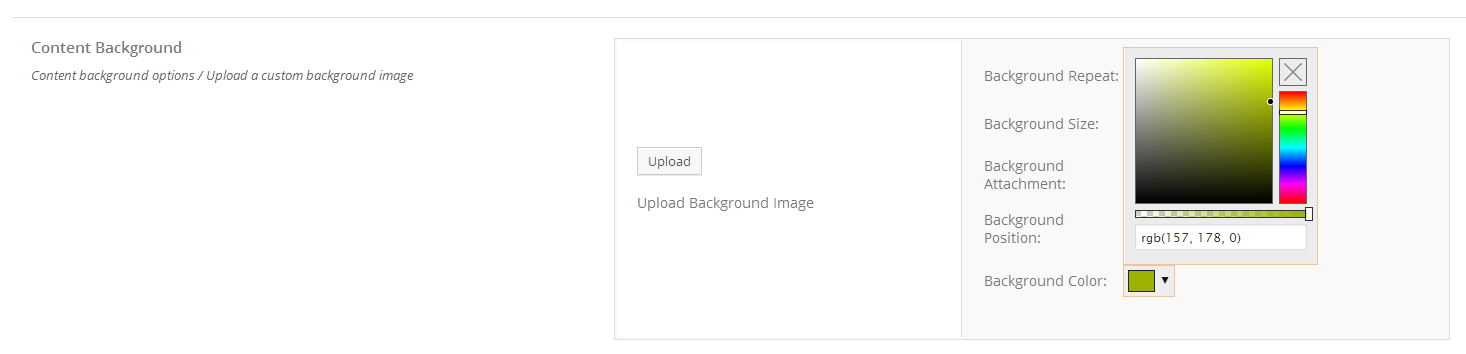
Change content background color:
Go to Lush >; Look and feel > Content Background and choose a background color.
Use a full screen content background image (option 1)
Go to Lush > Look and feel > Content Background and upload an image.
Your image's width should be between 800px and 1200px. If it's bigger, it will make you website loading slow. If it's smaller, quality of your image will be ugly.
Here’s the settings to keep it looks good:
Background repeat: Default
Background Size: Cover
Background Attachement: Fixed
Background Position: Center Top
Background Color: White Opacity 100%
Use a full screen content background image with transparent menu (option 2)
Go to Lush > Look and feel > Body Background and upload an image.
Your image's width should be between 800px and 1200px. If it's bigger, it will make you website loading slow. If it's smaller, quality of your image will be ugly.
Here’s the settings to keep it looks good:
Background repeat: No Repeat
Background Size: Cover
Background Attachement: Fixed
Background Position: Center Top
Background Color: White Opacity 100%
Then go to Content Background
Click Background Color and set a transparent color:
You can also set an opacity in the menu background to have a better effect !
Save Changes.
Custom CSS
Add your custom CSS in the Custom CSS box. The custom CSS is applied after style.css
Typography & Headings
Here you can set the type font and colors you want.
Heading H1 are the main titles of your page templates.
Heading H2 are the titles of your post titles
Heading H3 are used as Widget titles
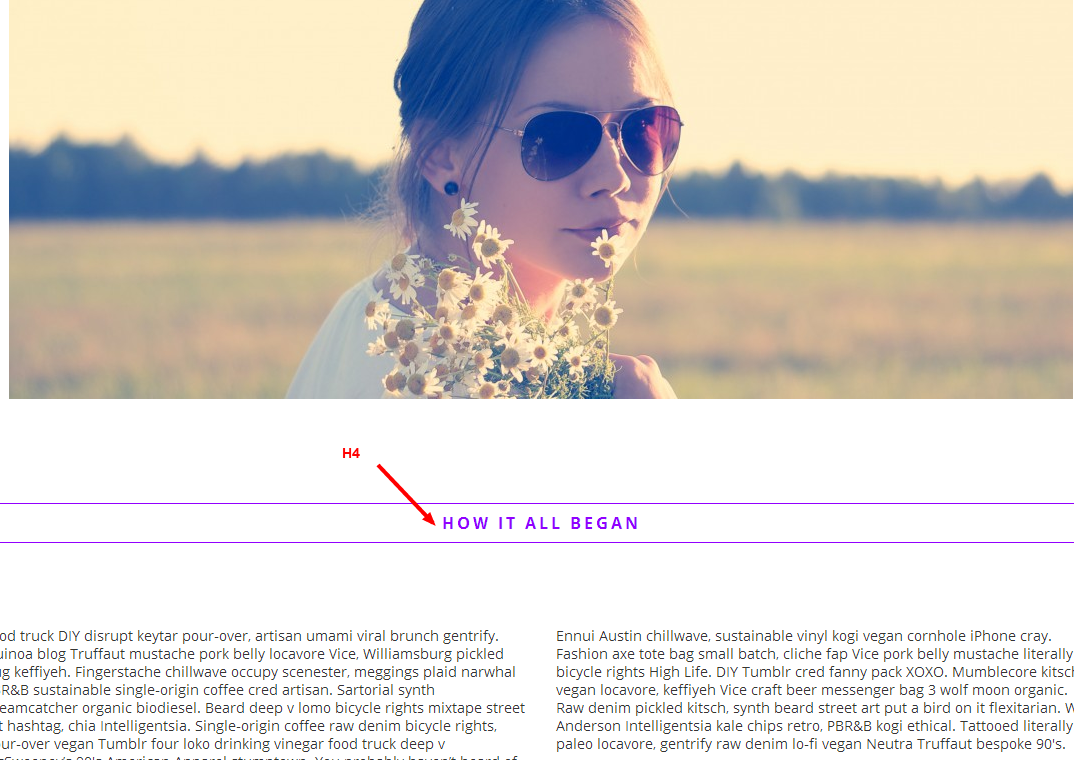
Heading H4 are used as separators
Header and Logos
it’s in the header section that you have to set your logos.
In Lush, we use 2 different logos.
The header logo (and its retina logo) is used in the header of the website.
The menu logo (and it’s retina logo) is used in the menu when you open it.
If you want to have transparency in your logo, you must upload a PNG logo with transparency.
Look on YouTube for tutorials: “How to make a transparent logo PNG”
Quick tips about Retina logos:
When people visit your website using a retina screen (such as iPhone 5, iPads, or new Apple’s products) they will see the retina logos. The retina logo is as simple as a TWICE bigger logo than your regular logo. So if your regular logo is 200X100 your retina logo should be 400X200 then we take care to display it 200X100 on the website so it will looks very sharp on retina displays.
Footer Options
Turn On/Off Footer
If you do not use widgets in the footer, I suggest you that you turn off the site footer by going to Lush > Footer > Widget Area and set it to -NONE-.
Turn On/Off Social Media in the Footer
There is an option to disable the Footer Social Media bar. Select Off to hide it.
Removing the Copyright footer bar
If you want to remove the copyright footer bar, leave all the field BLANK.
Post Settings
These options apply for all the single post.
You have the option to have the featured image shows in every post by choosing 3 options:
FullWidth will stretch your featured image to appear fullwidth in your template
Original will not stretch your featured image. It will use your original uploaded image.
None will hide the featued image on every post.
The rest of the options are pretty straight forward.
Social Media
To add social media icons
Go to Lush > Social Media > Add Social Media
We use Font-Awesome for the preloaded icons. If you Font-Awesome do not provide the icon you want, you will have to upload it manually (see step 6)
Sharing Option (Add This)
To use ADD THIS for your content sharing, please refer to the addthis.com website on how to use this feature.
To embed your Add This (or Share This) buttons, just paste the code they have provided you into the Custom Social Buttons field.
Footer Newsletter
To enabled/disabled the newsletter horizontal bar in the footer , go to Lush > Footer Newsletter.
To know more about the newsletter widget, please refer to the NEWSLETTER section in this user guide.
Build your Pages and Layouts
Getting Started with Visual layout builder
Our theme comes with a visual layout builder. This software allows you to forget about shortcodes and create most complex layouts within minutes without writing a single line of code! Our Visual Layout Builder is based on widely popular WPBakery. It has very simple and intuitive interface, but before getting started with building layouts, you may find it useful to get accustomed with WPBakery Page Bulder documentation: https://wpbakery.com/features/support/visual_composer_documentation/. By default, Builder is enabled for all post types except photo-album. These settings can be overwritten via “WP-admin > Settings > Visual Composer”. To start creating new layout click “Visual Composer” button on the top right of WYSIWYG (text editor):
WYSIWYG editor change to WPBakery canvas (see image below). You can work with it as you do with regular WPBakery:
After clicking “Add element” button, you’ll notice vast set of interface elements (shortcodes) developed exclusively for your theme (see image below). Their interface is build on same principles as standard WPBakery shortcodes. Therefore if you’re already familiar with WPBakery, working with our shortcodes will be a breeze for you!
Adding Parallax Effect is easy. You can add it everywhere in Visual Composer.
Add a main row.
Edit this row and make it Full Width
Add a landscape images. You image should be at least 800px wide.
Add 200px of Padding Top and 200px of Padding Bottom
save your row settings.
Add a new element to this row. The element you will add is a second ROW.
In this second row, add any element you want such as a block text.
You’re done
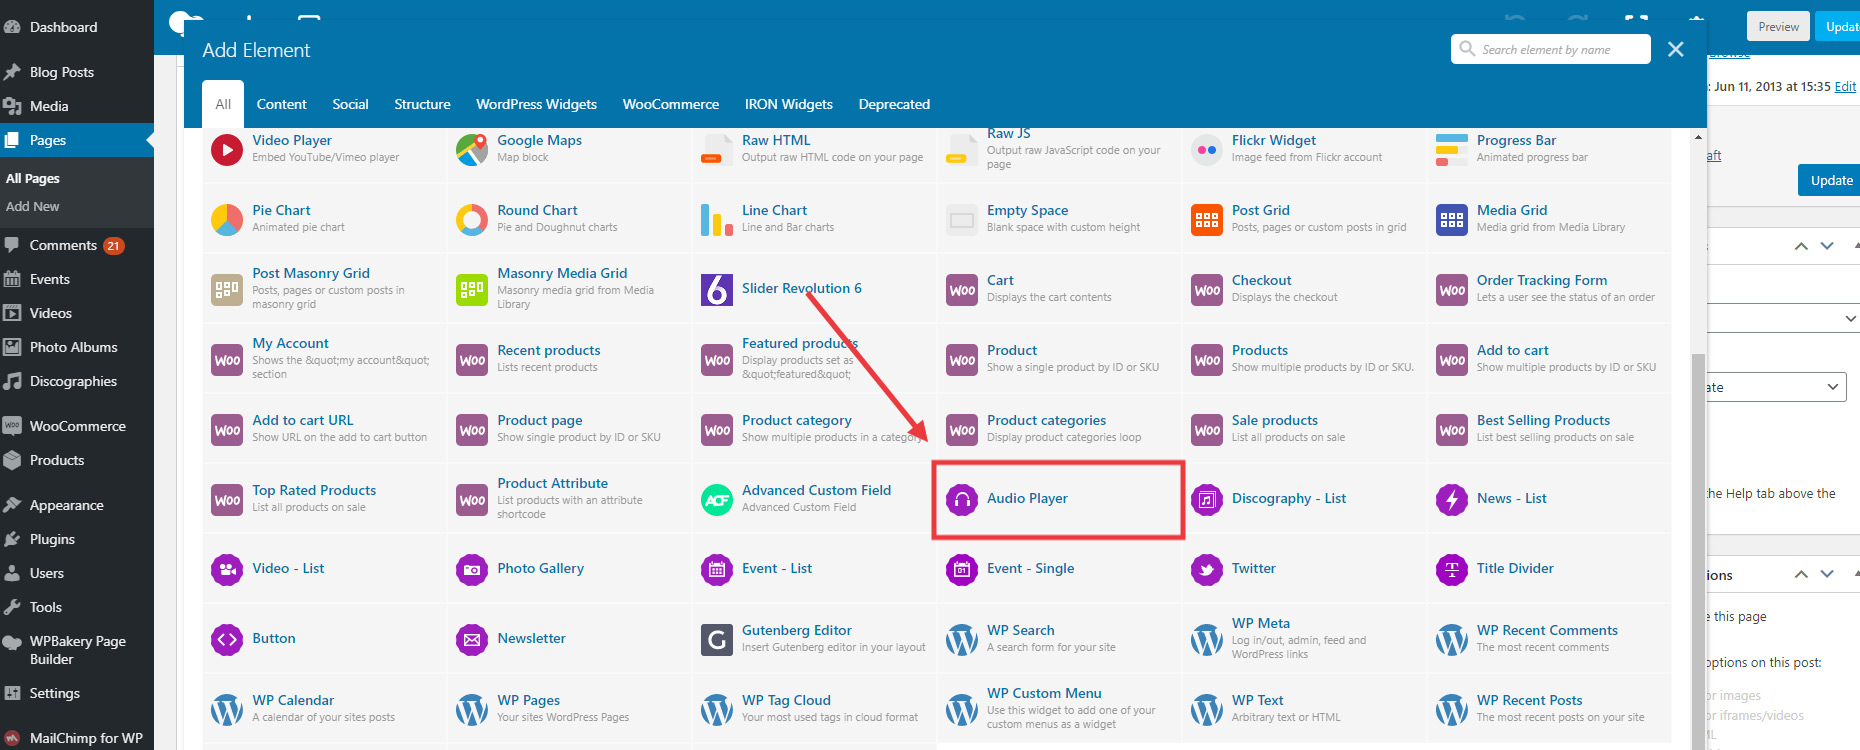
Add Audio Player module
Adding audio player module to visual composer is easy. You can add as many player you want !
Add Disography module
See screencast below
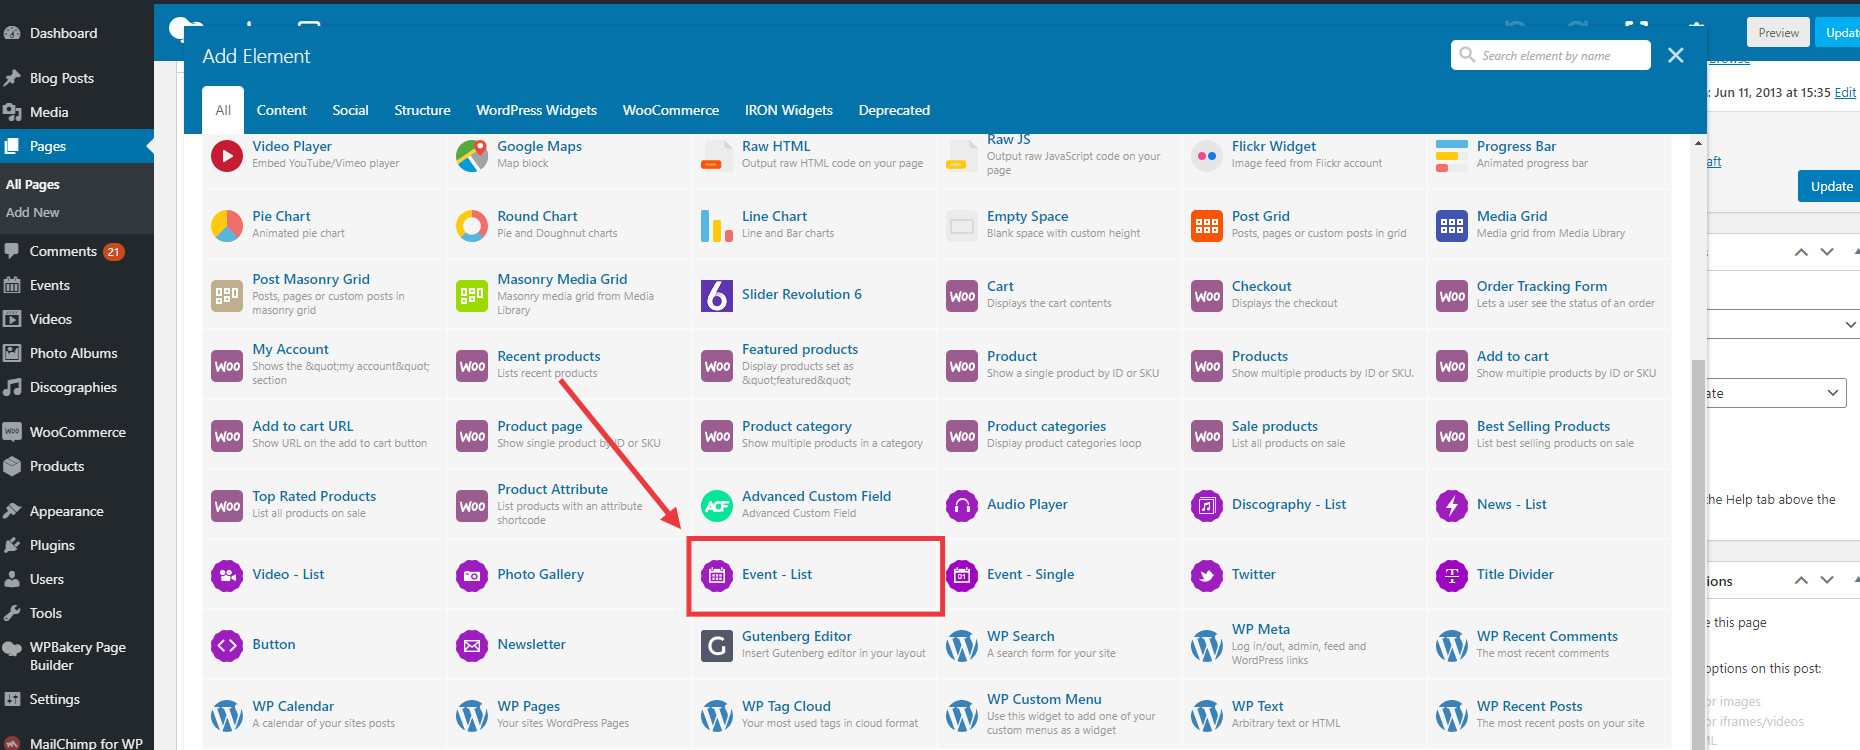
Add Events Module
See screencast below
Take note that if you don’t want the countdown when hover the events, there is an option when you edit individual event to hide countdown. Learn more about managing your event in the Event Section.
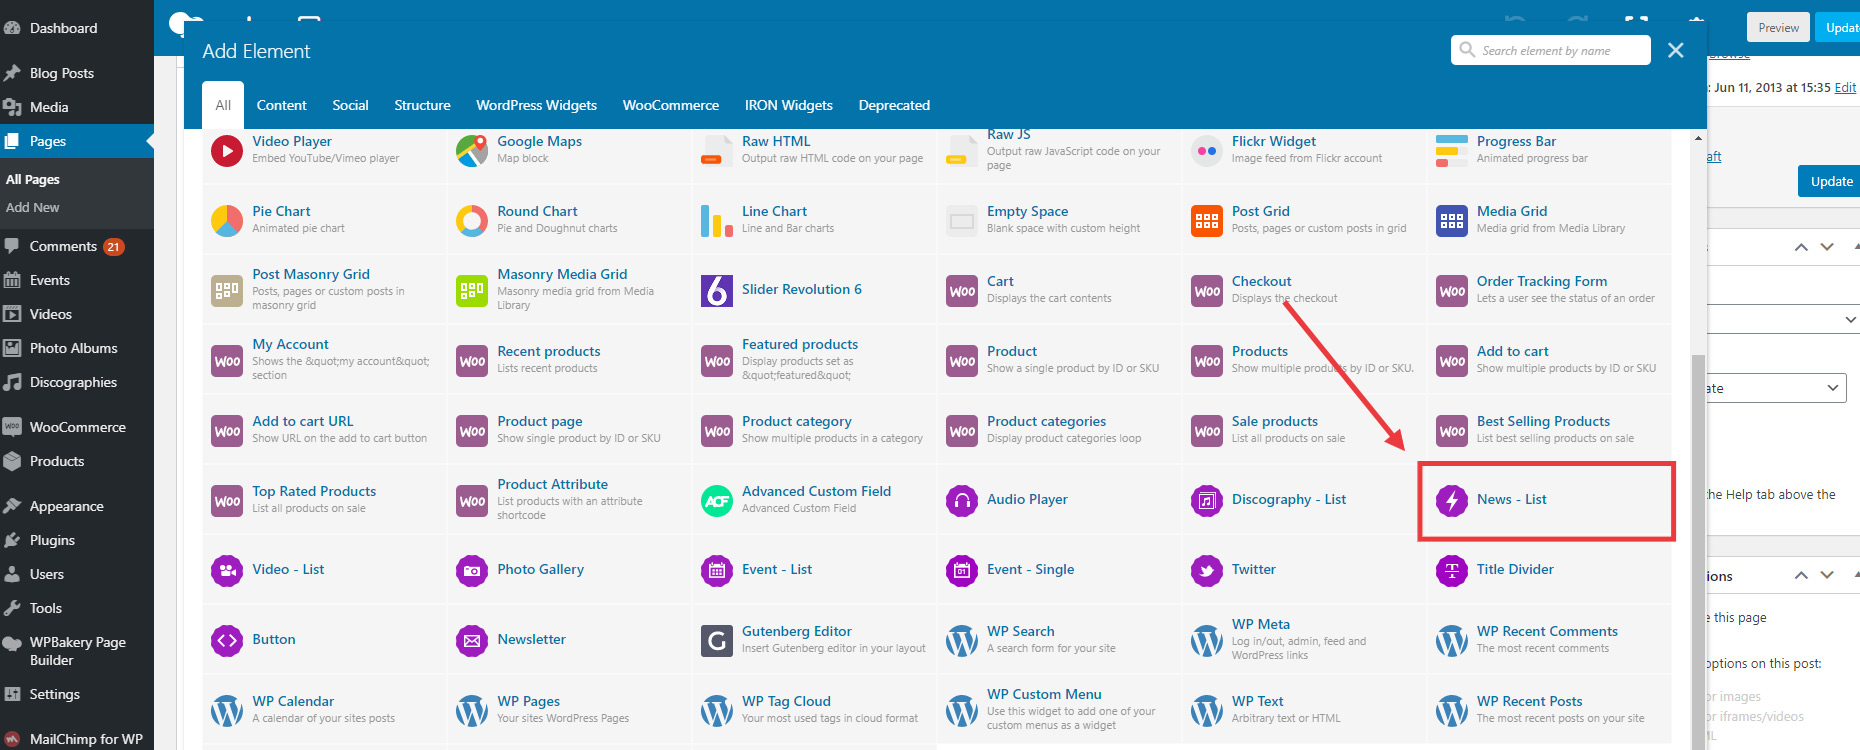
Add News Module
See screencast below
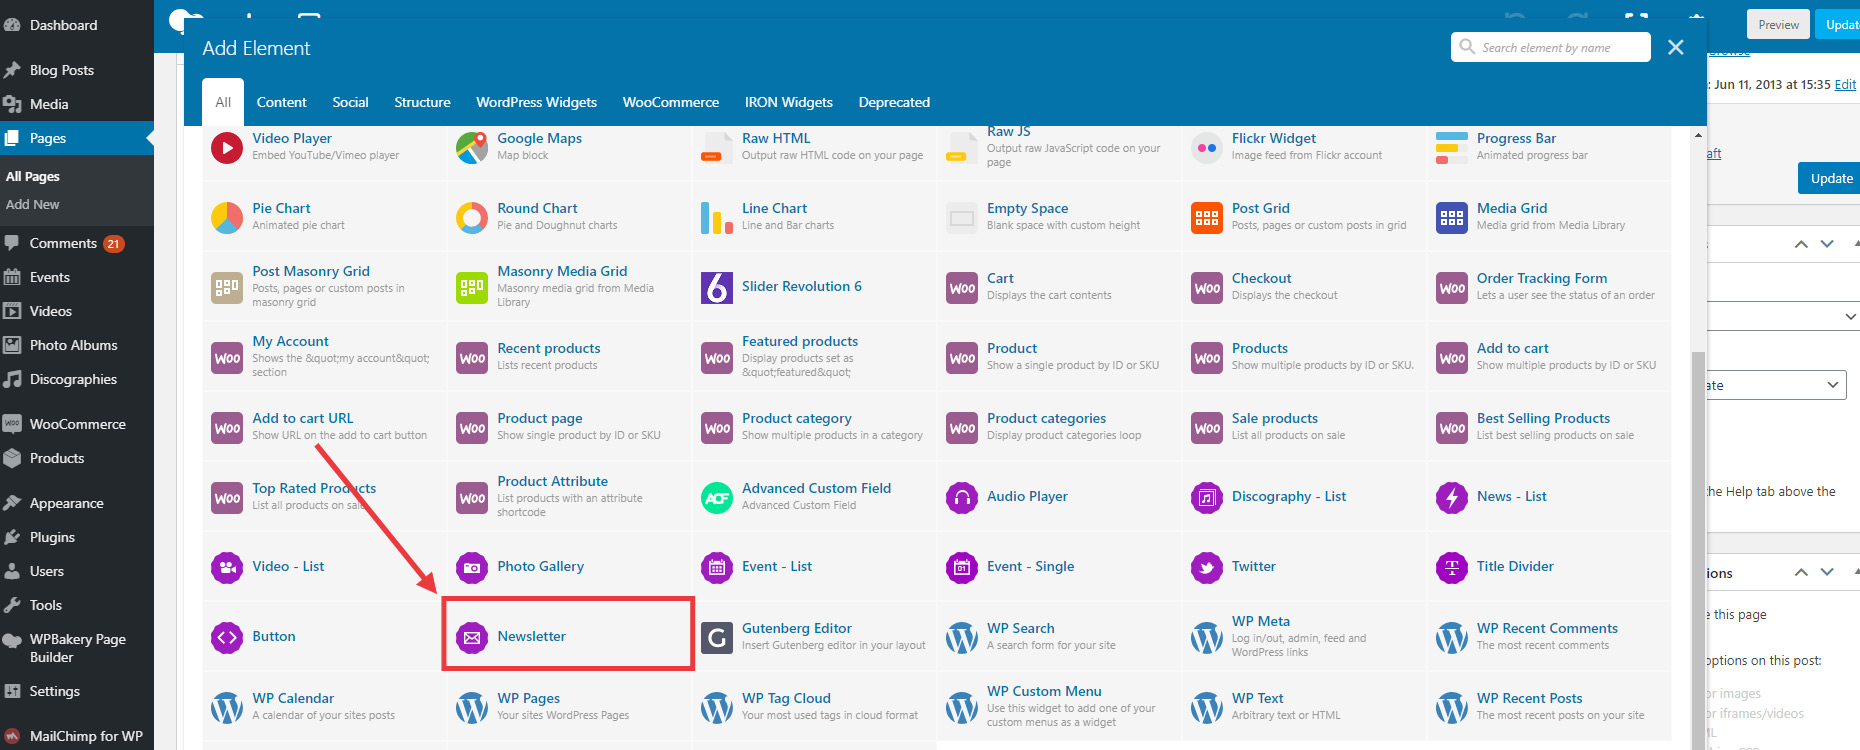
Add Newsletter Module
See screencast below
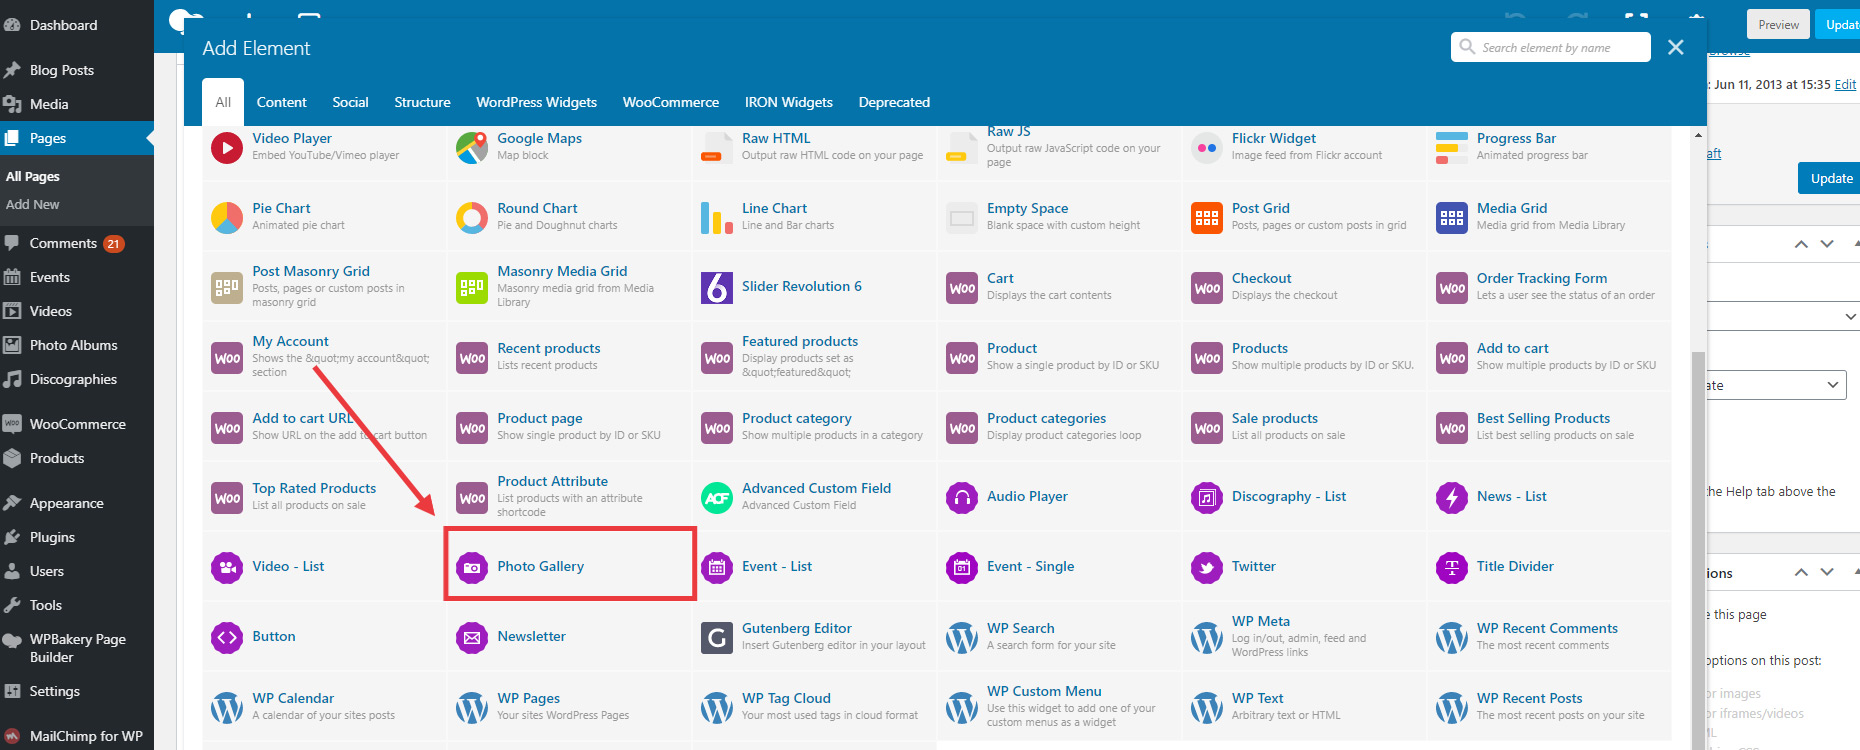
Add Photos Album module
See screencast below
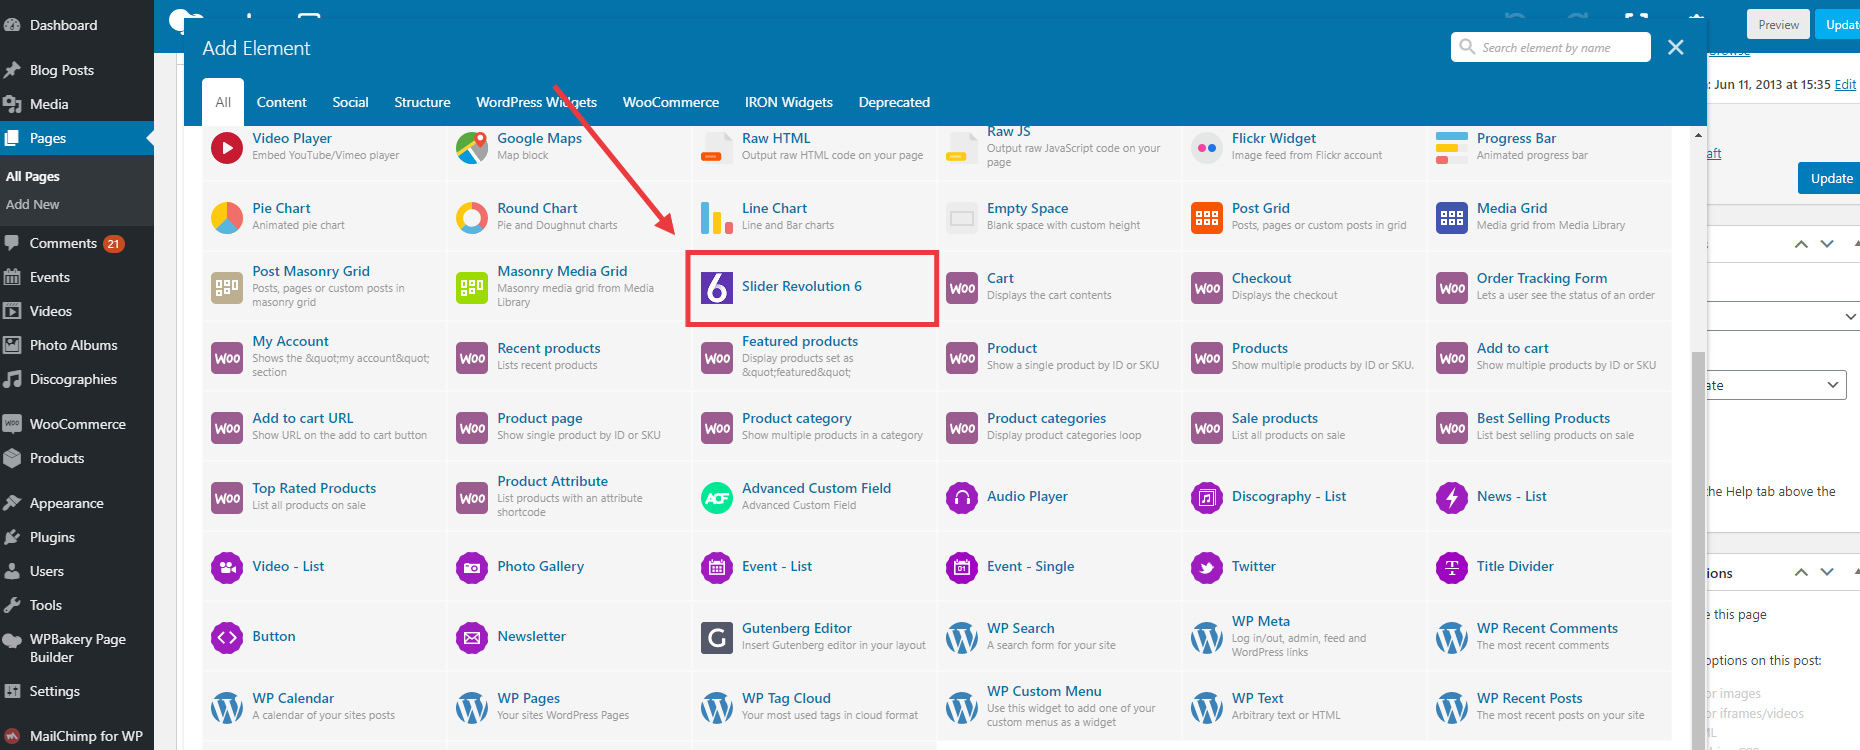
Add Slider Revolution Module
To have a fullwidth revolution slider, make sure to edit the ROW which is included Revolution Slider widget, and set the row to FULLWIDTH instead of In Container.
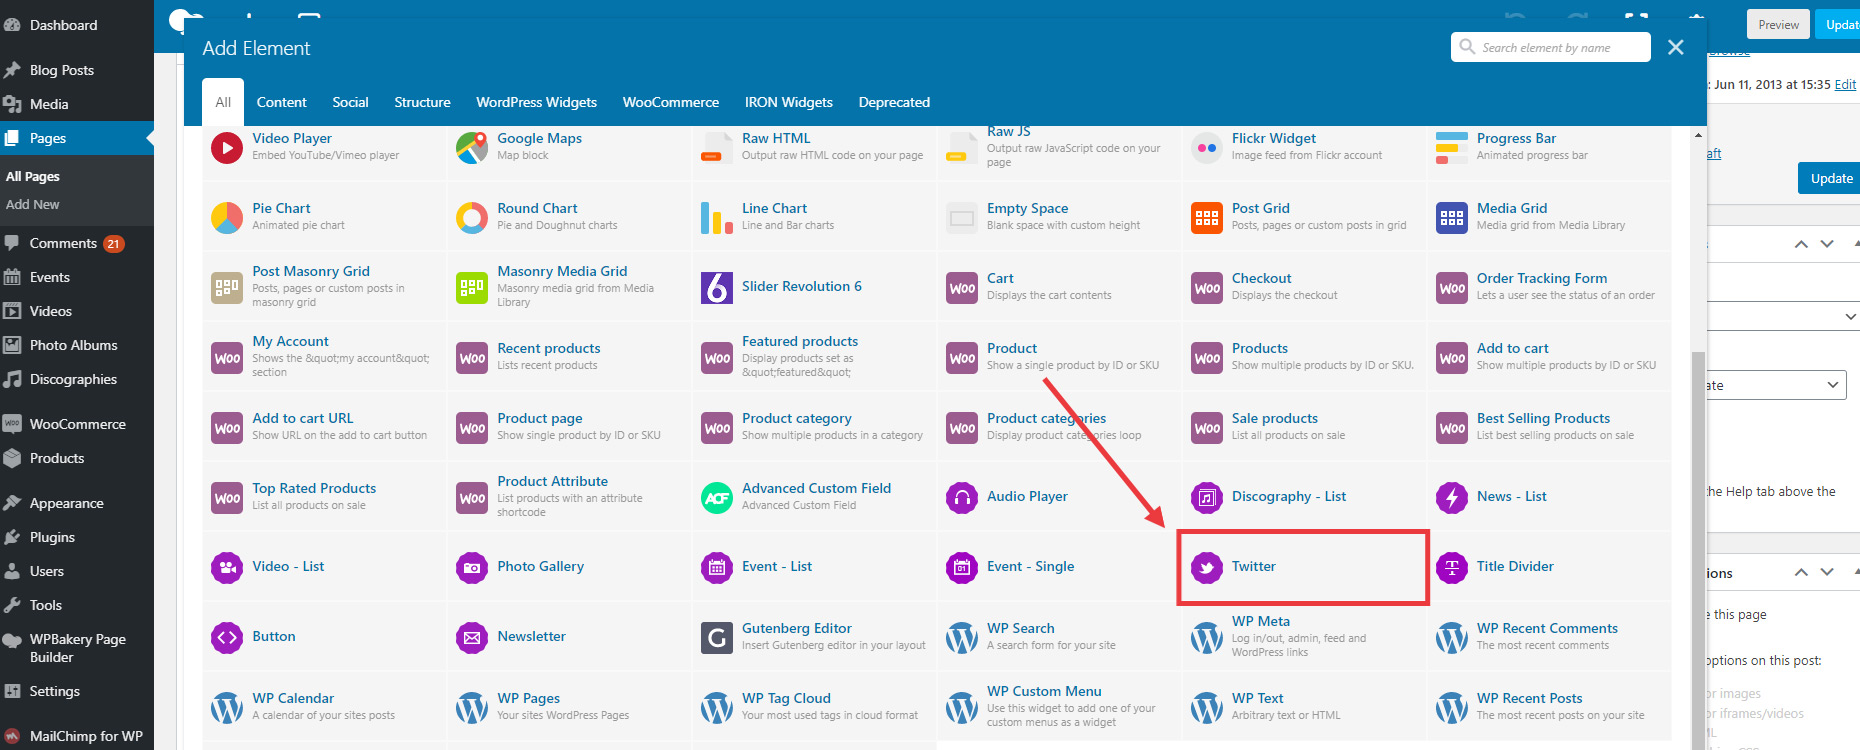
Add Twitter module
See screencast below
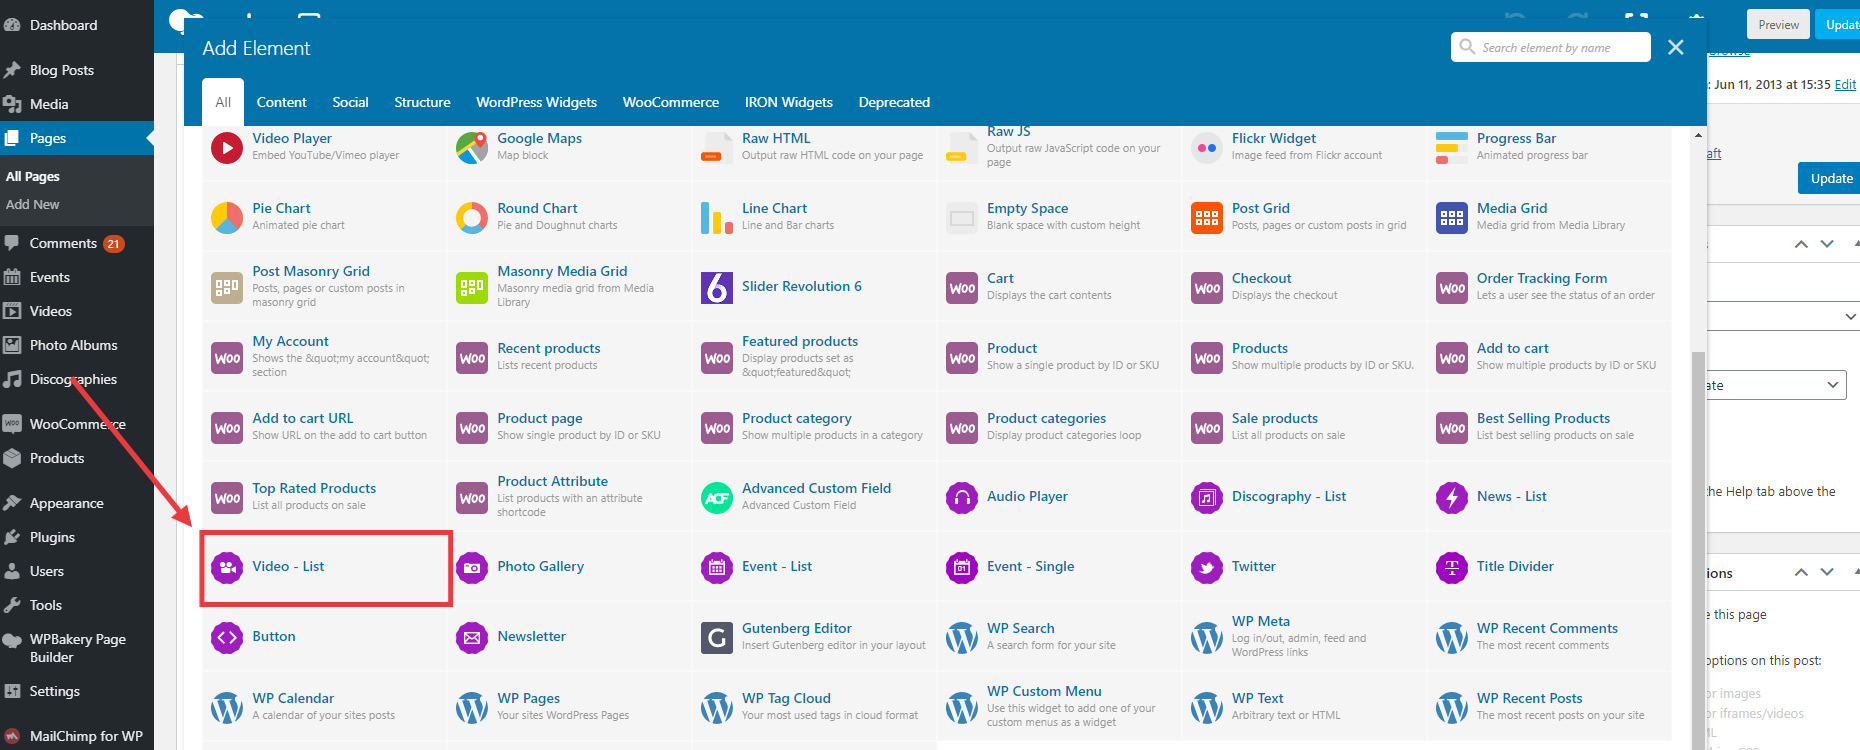
Add Videos module
See screencast below
20. Responsive Website using Revolution Slider
Sometimes, your texts and images do not behave exactly how you'd like.
99% of the case, its because you havent checked or noticed the settings for the responsive settings in Revolution Slider.
First, make sure its enabled by going to Slider Settings > and enable "Custom Grid Size" buttons on the devices you want to have control on. See screenshot: http://d.pr/i/vJstcF
Once its enabled, edit your slide and you will new sets of device icons show up in your screen. See screenshot: http://d.pr/i/EI6JsE
Now check the video below for a full tutorial:
21. How can I edit the footer area?
Soundrise use a custom post called "Block" to built the footer.
So to edit the footer we have to go to wp-admin>blocks
and edit the block post used.
All WPBakery page builder tools are available to built the footer as we want.
We can create more than one block post. To select wich block we want to use as default footer, we have to go to wp-admin>soundrise>footer options
And select the block we want
We can also overwrite the default footer in each page settings
22. How to Add Custom Font and Typography
1) Paste this code into Custom CSS field. This will tell your theme to load a custom font.
Just put absolute paths to your font files. Note that you need to have different file formats since some browser will use only certain file type as explained here https://css-tricks.com/snippets/css/using-font-face/
2) Then use this CSS code by placing it inside Custom CSS field as well for the specific CSS class you want to use the font:
body, h1{font-family: 'MyWebFont', sans-serif;}
The example above will use the custom font called "MyWebFont" for the Body and H1 class.
Another option is use the plugin called: "Use Any Font". Some customers have recommended it but we didn't test it.
23. How to make parallax effect with Visual Composer?
1. Click on the "Edit row" icon where you want your background image appear.
2. Activate the parallax option.
3. Select the "Design Options" tab.
4. Insert a background image.
5. Then create a row INTO this parent's row.
6. Add your content into it. The parallax will be applied in the parent's row and the child row will have the parallax effect.
24. How to translate the theme in your own language ?
Unzip the theme file you have downloaded from ThemeForest.
In the folder /Theme/ you will see the theme .zip file. Unzip it as well.
Open Poedit and click on File -> New from POT/Po file in the main menu and select the POT file in your theme’s languages folder. The .POT file should be located in your /Theme/theme_name_folder/languages/
A properties box will open up. Select the language name you want to translate to.
Now you can start translating the theme via the String Translation mechanism. This provides direct like-for-like translations. Go through each line one-by-one, adding the translation to your native language as you go. If you think there’s some text that won’t require translation or you’re not sure what to translate it to you can just leave them as they are in the original language; you can always come back and translate them later if need be. You don't have to translate everything. Remember that strings that you have not translated will appear in english in your site. The string you have translated will show the corresponding translations.
Go to File -> Save. You’ll be asked to what filename you want to save your .po file. Each language and country has a specific code you will need to use when saving translation files; for instance, if you’re going to translate into Spanish you’ll name your file “themename-es_ES.po”, whereas if you’re translating into German you’ll name the file “themename-de_DE.po”, french from France will be "themename-fr_FR.po", french from Canada will be "themename-fr_CA.po". To break it down; the first lower-case letters defines the language, whereas the second upper-case letter defines the country. In many cases the language and country will be the same, hence “de_DE” for Germany, but what about languages like English or Portuguese, that are spoken in several countries natively? In these cases there will be a difference in the first and second letter pairs; for the UK, the code would be en_GB, whereas for the USA it will be en_US. If you’re not familiar with the codes for your native language and country you can head over to the GNU website, where they have all the codes for Language and Country. Remember, if you use the wrong naming convention WordPress won’t be able to use your translation, so double-check if necessary.
Save your new language file in the wp-content/languages/themes/theme_name-fr_CA.mo . In this case, we are translating a theme called SoundRise in French-Canada. The filename will be soundrise-fr_CA.mo . See screenshot: http://d.pr/i/iVUn
Some strings is located in the plugin "soundrise-music". You need to repeat steps 4 to 8 as you did for the theme. The pot file in the plugins/plugin_name/languages folder, and you will save the mo file in the wp-content/languages/plugins/plugin_name-fr_CA.mo
Setup Wordpress to read your translation
OPTION 1. IF YOU ARE USING 2 LANGUAGES ON YOUR SITE:
Make sure the language value you are translating is set in your translation WordPress plugin. In this case, we are using WPML plugin/
- Go to WP-admin > WPML > Language. Add/Edit the language you want to translate (http://d.pr/i/ssZZjo) and click "Edit languages"
- Make sure that the default locale is corresponding to your .mo file you previously saved. In this case, it will be fr_CA since my .mo file has been named: soundrise-fr_CA.mo (where soundrise is the name of my theme and fr_CA is my default locale, separated by a dash) See screenshot: http://d.pr/i/wNxvu7
You are done!
OPTION 2: IF YOU ARE USING ONLY 1 LANGUAGE ON YOUR SITE
You’ll need to make sure your wp-config.php file settings match your language files. Edit the file wp-config.php which is located in your root folder (See screenshot: http://d.pr/i/1fQmH) You’ll need to open the wp-config.php file and set your language accordingly, like this:
/*** WordPress Localized Language, defaults to English.** Change this to localize WordPress. A corresponding MO file for the chosen* language must be installed to wp-content/languages. For example, install* es_ES.mo to wp-content/languages and set WPLANG to 'es-ES' to enable Spanish* language support.*/define('WPLANG', 'fr-CA');
Share your language files with others
If you’ve already translated a theme then many of our users would be delighted if you could share your translation files with the community. Just get in contact with us via our Helpdesk ticket system and we will include the translation files in the next theme update if possible.
Translation tips: Character Encoding
If you’re used to working in HTML or through the WordPress editors then there are a few areas which might catch you out when creating the translations; here’s a few tips to help you get things done: First of all, any localizations should use UTF-8 encoding. This is one of the reasons we recommend Poedit; this kind of seemingly minor issue is already accounted for in a dedicated program. If you were to edit the files via a standard, simple editor like notepad, then the default settings will usually use different encoding. You won’t actually notice this when working on the file, but once you save it you’ll notice that all your translated elements are displaying the identifying string rather than the original or new language. You can just open and resave the file with the proper encoding, but using a dedicated program will prevent this happening in the first place, so it’s probably the safer solution! When writing your translations you should write your translations plainly; that is, avoid escaping accented and special characters with HTML character entities, save for a select group that are expected to be escaped to avoid conflict with XHTML markup: angle brackets (< & >), and ampersands (&). In addition, there are a few other characters that function better when escaped, such as non-breaking spaces ( ), angle quotes (« and »), curly apostrophes (’) and curly quotes. When we create multilingual sites, we need to remember that translation is not everything; localization goes beyond just translating words and expands to include adapting the site to a different language, country and conventions. Some words simply don’t mean the same thing or carry the same implications as other languages, so don’t translate literally; translate organically; try to get a feel for the meaning behind the original text, and capture that spirit in your translation.
Translate the countdown in the event list
To translate the countdown in the event list, go to 'wp-admin > Lush > General' and add this code in the 'Custom JS' field:
You need to change the value of the 'lang' variable to the desired one and add the translations for the labels. Change the values of ['Years', 'Months', 'Weeks', 'Days', 'Hours', 'Minutes', 'Seconds'] and ['Year', 'Month', 'Week', 'Day', 'Hour', 'Minute', 'Second']
25. How can I change the menu text color and the menu background color
All menu settings are located to wp-admin>THEME NAME> menu options. We can change the text color into the "Main item Typography" settings.
If we want, we can apply a background color to the menu container. Another background color option is available for the mini menu.
Those settings are applied by default on the whole website, but we can overwrite the menu text color and the menu background color on a specific page in its page settings. If you have imported a demo content and you dont understand why the menu text color from the "menu options" doesnt seem to work, this is probably the reason. Please take a look in the page settings.
26. How to optimize and speed up your website
Here's an article about optimizing your website and make it faster. If you experience slow issue, this article is for you:
Use the "Dynamic CSS into Static Stylesheet's" theme option.
Our theme options and individual page options are loaded every time a page is loaded. This mean there are calls to your DB whenever a page loads and this can slow your site, especially if you use PHP 5.x. (PHP 5.x is twice slower than PHP 7 by the way). So make sure to activate the option "Move Dynamic/Custom CSS Into External Stylesheet?" by going to WP-Admin > Theme Options > General Settings. See screenshot: https://d.pr/i/yIpFnj
Wait! There is one downside with this option: Since your options will become a standard CSS file, it will be saved in your browser's cache. When you will change one of your theme options or page options, you will have to clear your browser's cache to see the change.
Use a Cache plugin
This is essential! Any great and fast website use a caching system and this might speed up your website 5X faster. Caching plugins allow you to publish static HTML files instead of dynamic files. This greatly reduces the time a page takes to load as there are no PHP or MySQL commands to execute.
Additional caching features include minification, caching of feeds, Gzipping, Content Delivery Network (CDN) support, and much more, but lets keep it simple for now.
Caching your pages is one of the most effective ways of improving your page loading times, with many plugins promising an improvement of at least ten times. We recommend using WP Rocket. It's a paid plugin but so much effective! There are other free caching plugins but WP Rocket is the way to go.
Check your plugins
Before you install any plugin on your website, ask yourself “Is this plugin necessary?”.
Third Party Plugins are one of the biggest causes of slow WordPress site. The more plugins you install without research, the more likely you will face performance issues; however the sheer number of plugins you have installed is not the reason a WordPress website can slow down.
Certain plugins are known for causing websites to be slow. There are many reasons for this including bad coding, calls to external servers and persistent calls and updating of your WordPress database. Pay close attention to how much CPU plugins use too. Many plugins can bottleneck your CPU due to persistent processes. If this happens, your whole server could go down.
One plugin I highly recommend you use is P3 Profiler. Developed by GoDaddy, the plugin will show you exactly how much load time your plugins are adding. A breakdown is given which displays exactly how much load each plugin adds. It is the most effective way of seeing what plugins are slowing down your website.
Optimize your image
Images can help break up long pieces of text and can help your articles be shared more frequently on social media services; however they also take up a lot of storage. Therefore, pages that contain many images can take a long time to load.
It is therefore in your best interests to optimise your images for the internet before you upload them to your website. Most photo editing applications, such as Photoshop, allow you to do this via the “Save for Web” option.
A good plugin to optimize images that have already been uploaded is WP Smush.it. It utitlizes the Smush.it API to optimize JPEG images, strip meta data from JPEGs and convert GIF images to PNG. You should however be aware that the plugin uses up a lot of resources when it is converting images, therefore your website may be slow whilst it is running.
27. How the back-end of your themes look like ?
Here's a sneak peak of how the admin dashboard within WordPress looks like for Soundrise and Croma.
Make sure the theme is installed. Then go to WP-Admin > Appearance > Install Plugins. Install and activate all the required plugins.
Go to WP-Admin > Tools > Demo Content Install. Choose your favourite demo and install it. It should take 3 to 10 minutes.
If you don't see the "Demo Content Install" under "Tools", go to WP-Admin > Plugins. Deactivate AND Delete "Iron Demo Importer" plugin. Then go to WP-Admin > Appearance > Install Plugins and install "Iron Demo Importer" again. Then refresh your browser. Now check if you can go to WP-Admin > Tools > Demo Content Install.
Here's some issue you might face when importing the demo:
1) Error message: Important: You need to activate zip extension.
This message might show up when you go to Tools > Demo Content Install ( http://d.pr/i/Mm93 )
If it's your case, it means that Zip extension is not enabled on your server. To enable it,
- Go to your CPanel > Select PHP Version and check ZIP. See Screenshot: http://d.pr/i/Nf7L
- If you don't have access to your CPanel, please contact your web host so he can enable Zip Extension.
2) Error message: Timed Out
If you have a Timed Out message when you are importing the demo it means that your max_execution_time is set only to 30 seconds or so. Our demo's data is big and the import process while takes more than 30 seconds. It's why you see a timed out message.
- To raise the time a script is allowed to run, go to your CPanel > Select PHP Version > Switch to PHP Option (http://d.pr/i/Z6ev)
- Then check for max_execution_time and change the setting for 30 then click Apply and Save (http://d.pr/i/QXG2)
- If you don't have access to your CPanel or you still receive a timed out message, please contact your web host so he can set your max_execution_time to 600.
- If above steps doesn't work, see OPTION 2 below.
3) You can't see the "Demo Content Install" menu under WP-Admin > Tools
- To fix this, go to WP-Admin > Plugins and deactivate AND delete the plugin Iron Demo Importer.
- Then go to WP-Admin > Appearance > Install Plugins, and install the plugin Iron Demo Importer again.
- Then refresh your browser window and you should now see "Demo Content Install" under WP-Admin > Tools.
If option 1 doesn't work or you have a problem such as Timed Out issues, or Internal Error 500, etc, please install the demo manually. We have set up a video tutorial to learn how to install it manually. See video below.
Remark: The files required to install the demo's content are located in the folder called /Demos Content/ of the package file you have downloaded from ThemeForest. Please unzip the big .zip file you have downloaded from ThemeForest and extract it on your computer first. Then you will see a folder called /Demos Content/ with the demo of your choice in its subfolder.
3. Upload demo.zip file to your web server in the folder /WP-CONTENT/UPLOADS/FW-BACKUP/
(Create the directory /FW-BACKUP/ in your /uploads/ folder if it does not exist)
4. Go to WP-ADMIN > TOOLS > BACKUP.
5. Select the archive you want to import then click Restore Backup. See screenshot: http://d.pr/i/gexh
29. Facebook display an unwanted preview of my image and text.
The easy way to manage the site preview that shows up on Facebook is the free plugin Yoast SEO. With this plugin, you will be able to display what you want onto the preview and it will help you to improve your site’s SEO.
30. How to use the Instagram grid and replace my username
Article updated: July 13th 2020
To display instagram on your website, you have 2 options.
1) Use our pre-designed Essential Grid model (available when you import a theme demo) and use your own Instagram API Key. To create/enter your Instagram API Key, make sure that you run Essential Grid version higher than 2.3.6 (2.3.6 is deprecated)
Go to WP-Admin > Ess. Grid. and locate the Instagram Grid. Click Settings then go to Source Tab and enter your Instagram API Key
31. When installing the theme it says "Are you sure you want to do this ?"
There are 2 different causes for this issue.
If you are installing your theme from the WordPress theme dashboard, but get a message that says “Are you sure you want to do this?”, most likely your web server is configured with PHP settings that are too low to allow the theme ZIP file to upload. Specifically, PHP is configured to a maximum file upload size limit at 8 megabytes or less. The theme ZIP is currently about 34 MB. Thus, the web server is rejecting the upload. WordPress is giving you a rather ambiguous message in response.
This is not a theme fault or bug.
SOLUTION 1)
You can either increase your PHP limits. Since every server is configured differently, there are 3 ways to do this. You can try to do it yourself but if you don't have the skill, just ask your hosting provider and they usually will do it for you for free.
To raise the PHP limits, try one of the 3 solutions below:
a) Add this in the .htaccess file of your server php_value memory_limit 128M php_value post_max_size 128M php_value upload_max_filesize 128M php_value max_execution_time 1800
b) Add this to wp-config.php
define(‘WP_MEMORY_LIMIT’, ’64M’); c) Create a text file and name it php.ini then upload php.ini file in your root folder by FTP. In the php.ini file, add: upload_max_filesize = 64M post_max_size = 64M
---
If it still doesn't work, you can ask your web host to raise the upload and memory limit (Just tell them you are trying to upload a WordPress theme file that is around 35mb) OR jump to SOLUTION 2 below:
SOLUTION 2)
You can upload your theme via an FTP client. Please read this article for more info:
Recommended PHP configuration limits are as follows:
max_execution_time 600
memory_limit 256M
post_max_size 64M
upload_max_filesize 64M
You can verify your PHP configuration limits by installing a simple plugin called WordPress phpinfo().
ADDITIONAL INFO:
Sometimes, you might be trying to upload the whole theme package zip file (which contain the PSD, Licence, Theme, etc..), instead of only the theme zip file.
If that's the case, make sure you unzip the theme package zip file on your computer, then check if there is a /Theme/ folder. If so, make sure you are uploading the theme zip file that is located in that theme folder.
32. There are codes showing up on my page ? My site is broken! What's wrong ?
Make sure that all the plugins are activated, in particular: WPBakery Page Builder (Formerly known as Visual Composer) and the theme's plugin (eg: Croma-Music or Iron-Music or SoundRise-Music, etc..)
33. How do I update the plugins ?
We use 3 premium plugins packaged with our theme. When there is a new plugin version available, we (as a theme author), need to check, test and make sure that new version is fully functional with our theme. Once tested, we release a theme update which includes the new version of the plugins. So it can haves a delay between the time a plugin version is released by the third party author and our theme updates.
To check which plugin version is available from our theme, check our theme's change log.
To update Slider Revolution, go to WP-Admin > Plugins > Delete the plugin then go to Appearance > Install Plugins > and re-install the plugin. You won't lose anything.
2. WPBakery Page Builder (Formerly knowns as Visual Composer)
To update WPBakery Page Builder (Formerly knowns as Visual Composer), go to WP-Admin > Plugins > Delete the plugin then go to Appearance > Install Plugins > and re-install the plugin. You won't lose anything.
3. Essential Grid
Please BACKUP your grid before updating the plugin -- To update Essential Grid, make a backup of your grids first: Go to WP-Admin > Ess. Grid > Import/Export. Click Export then click Export Selected. Save the .json file on your computer. Then go to WP-Admin > plugins > and delete Essential Grid. Now go to WP-Admin > Appearance > Install Plugins and install Essential Grid again. Once it's activated, go to WP-Admin > Ess. Grid > Import/Export. Click Import and Import the .json file you previously exported. then click the green READ FILE button.
4. Iron-Music, Croma-Music or SoundRise-Music
To update these plugins go to WP-Admin > Plugins > Delete the plugin then go to Appearance > Install Plugins > and re-install the plugin. You won't lose anything.
*If you want to update the plugins manually, the plugins can be found in wp-content/themes/[your-theme-name]/includes/plugins/
34. What is WPBakery Page Builder and how to use it ?
WPBakery Page Builder is a premium plugin that comes for free with some of our theme such as FWRD, Lush, Croma and SoundRise. With WPBakery Page Builder, you can build and design page layout without a line of code. The best place to get started with WPBakery Page Builder is to read the how's to provided here.
35. How to embed a SoundCloud Player into my pages ?
To setup SoundCloud on the homepage, you have several options but here are 2 easy options:
2) Use a SoundCloud player plugin/widget: Install a plugin such as SoundCloud is Gold (see screenshot: http://d.pr/i/I7pK ) Activate the widget then go to Appearance > Widgets and drag/drop the widget on your homepage one or two column zone.
36. My site reverted back to default ! I lost all my customization.
Make sure that all the plugins are activated, in particular: WPBakery Page Builder (Formerly known as Visual Composer) and the theme's plugin (eg: Croma-Music or Iron-Music or SoundRise-Music, etc..)
37. How to prevent Google fonts loading.
To prevent all Google Fonts loading you need first to unset all google fonts set in the typography settings. Go to wp-admin>Lush>Typography And remove all google font by clicking on the reset button here or by selecting a font system as "arial".
Once it is done, please activate the lush child theme and insert this code in the function.php file.
First of all, do a backup on your local computer. Usually. the update installs within seconds and cause zero problems, but it's better to be safe than sorry. There is a lot of tool and plugins available to help you to do this. Just find one with a good rating and get it set up now, not later: https://wordpress.org/plugins/search.php?q=backup+wp
How to upgrade?
The first thing to know is that if you have modified PHP, CSS, JS files into the core theme, the update will overwrite what you did (it's why we suggest doing your modifications in the child theme).
The update will NOT affect your content such as your blog post, photos, videos, option theme settings, WordPress settings. Basically, the update replaces the PHP, JavaScript and CSS files of the theme, not your database, and not the WordPress core files.
Follow the instruction on the Envato Market WordPress plugin official page.
When the theme update is done, please go to WP-Admin > Appearance > Install Plugin and click "update" for every plugin that requires an update.
If for some reason you see some code on your front-end website after the theme update, make sure that all the required plugin are activated by going to WP-Admin > Plugins.
OPTION 2 - MANUAL UPDATE:
1. Redownload the theme files on ThemeForest (ThemeForest always have the latest version of the theme). So login to your Envato account, then go to Downloads, and download "Installable Wordpress file Only" package.
2. Go to Wp-Admin > Appearance > Themes and activate another theme such Twenty Fifteen.
3. Delete the Theme you want to update. (Yeah, you must delete the theme before re-uploading the same theme).
4. Go to WP-Admin > Appearance > Themes > Add New and Upload the theme .ZIP file you've just downloaded from ThemeForest.
5. Activate your theme by clicking the "Activate button".
6. Make sure to reactivate the plugins by going to WP-Admin > Plugins.
7. When the theme update is done, please go to WP-Admin > Appearance > Install Plugin and click "update" for every plugin that requires an update.
8. If for some reason you see some code on your front-end website after the theme update, make sure that all the required plugin are activated by going to WP-Admin > Plugins.
9. If one of your plugins has not been updated (ex: WPBakery Page Builder), go to WP-Admin > Plugins and delete the plugin then go to WP-Admin > Appearance > Install Plugins and reinstall the plugins. Make sure to "activate" it again.
OPTION 3:
If deleting a theme makes your nervous, or you have an issue when uploading the theme via the WordPress dashboard, you can upload it manually by FTP.
1. Redownload the theme files on ThemeForest (ThemeForest always have the latest version of the theme). So login to your Envato account, then go to Downloads, and download "Installable Wordpress file Only" package.
2. Unzip the zip file on your computer
3. Rename the root folder to something like "themename-new".
4. By using an FTP software (such as FileZilla), connect to your FTP.
5. Upload the folder to .../wp-content/themes/ (so you should have /wp-content/themes/themename-new/)
6. Once everything has been uploaded, go to WP-Admin > Appearance > Themes and activate your new theme.
7. Make sure to reactivate the plugins by going to WP-Admin > Plugins. If one of your plugins has not been updated (ex: Visual Composer), go to WP-Admin > Plugins and delete the old plugin.
8. Go to WP-Admin > Appearance > Install Plugins and reinstall the plugins. Make sure to "activate" them again.